Showing posts with label DIY. Show all posts

July 6, 2012

shoe box organizing


so the ladder part of my day has consisted of organizing!  is anyone else a receipt and bill keeper?  all of my receipts, check stubs, and paid bills find random places in my apartment to rest, which ends in large towers of papers everywhere!  so to say, "i've had enough" to the all of the papers in my life, i decided to put my shoe boxes to good use!

all you need is:
- some sharpies
- white index cards
- larger colorful index cards {for the backgrounds}
- staples
- tape
- paper clips {for the month labels inside}
- & some cute adhesive labels

i was determined not to go to the store, so most of this stuff i had laying around my house.  but i had fun organizing, this is going to make my room look so much better!  this is SO easy and WAY more affordable than buying those filing thingies at the office supply stores.

happy friday guys!
 

March 28, 2012

DIY: no-sew one-shoulder team spirit shirt


THE STORY
so about a week ago, a local TV station was giving away free t-shirts at a local car dealership in honor of the start of the NCAA tourny play {if you haven't noticed, KY basketball is kind of a big deal}.  so after work, i decided to mozy on down to the dealership and get me some t-shirts!!  i didn't expect it to be a big deal, but boy was i wrong!! i ended up waiting 35 minutes to get the shirts, but it was worth it!  the shirts were cute & my car was on television for like 5 seconds! lol

but i got an xtra-large & large shirt.  neither my roommate or i could where these shirts, so i decided it was DIY time!!

THE PROCESS

1}  try the shirt on & take note of how much you need to cut off in order to get the right fit.  note: you need to leave about 1 in. or an 1.5 inches of extra material to do the "no-sew" part on each side of the shirt.
2} flip the shirt inside out & cut off the extra material from the bottom.
3} with the shirt still flipped inside out, cut the sides of the shirt.  if you would like a more feminine fit cut the left side of the shirt in a ")" curved shape and the right side in a "(" curved shape.  this allows for a curved fit.
4} be cautious of the sleeves.  if they are huge then you will need to cut off some of the material from bottom of the sleeve.
5} while the sides of the shirt are still aligned cut the strips for the "no-sew" portion of the shirt about 1 - 1.5" long and as thin or as thick as you want, all the way up both sides.
6} tie up each pair of "frillies"   (you don't necessarily need to tie up the sleeve that you intend to cut off but you may want to tie up the curve of that sleeve little a bit)
7} after you tie up the sides flip the shirt right side out and try it on.  make a decision on how you want to cut one of the shoulders off.  i cut along the collar and then did a slight curve to the armpit of the opposite sleeve.
8} cut off the the sleeve
9} try on the shirt again.  if the side where you cut the sleeve off is too loose, then make the top "no-sew" stitch tighter by cutting the "frillies" longer for that stitch and re-tie the knot.

voila! a refurbished team spirit shirt! that is stylish and functional!  enjoy & as always comment with any questions and let me know how i did!!

have fun!

March 5, 2012

diy: custom iphone case

{onestep polaroid iphone case}

so i have to tell you the story...  i wanted to make a "team jasper" iphone case for my mother.  however all the design websites online won't let you use celebrity faces in your designs because they would be essentially selling the image without the rights to it.  this made perfect sense but put a damper on what i truly wanted to surprise my mom with.  so my dad and i made a project out of the gift.  we found away around this minor obstacle & in the process made custom cases WAY more affordable!  today, i'm letting you in on the secret.

you will need:

{a computer & printer}
{some shears or other cutting device}
{the griffin "reveal" iphone case}


step 1.  measure the case.

i used the measurements 4.54 inches tall and 2.28 inches wide.  but when we cut the image out it was a tad too big.  so i would try 4.5 inches tall and 2.26 inches wide.  make the judgement call when you measure your case but just keep in mind that it needs to be small enough to fit inside the case but big enough to not be bumped off center when you carry it around.
 
step 2.  select & trim the image.

use your computer to select an image from the web.  you can just print the image after you find one that suits your fancy BUT it is much easier to trim & crop your image to the right size in an image editing program.  it doesn't have to be anything fancy i use the "mask image" feature in "pages" on my mac but i'm sure you can use "word" or "photoshop" {if you're fancy,  trust me i'm broke & jealous}.  after you find the image then crop it, print the image.

step 3.  cut the image to fit in your case.

you will need to round the edges and cut out the camera whole {cutting the camera whole works best with an exacto knife}.  it's probably easiest to place the case  down and trace through the camera whole onto the back of your image after you cut the excess paper off of your picture.  your image should look something like the image above after you are finished cutting it down.

step 4.  finishing touches.

put your freshly trimmed image inside the case.  if the picture overhangs the camera whole take some time to trim it again.  after that... voila, you're done!!  enjoy your new awesome custom case!!!

just a few notes.  you can find the griffin "reveal" case in black at target however there is one silmilar in white at walmart, both should work.  you may find some other cases that may work as well but just make sure they have a piece of clear plastic on the back to hold your image in place.

if you have any questions, don't hesitate to ask!!
have fun & good luck!

December 23, 2011

DIY: the headphone crochet cozy

so i saw this picture on pinterest of some yarn wrapped around the chord of some headphones & thought, "that doesn't look hard!"  during finals week i needed to relax and i felt like crocheting but wanted to do something different.  so i tried to find a way to wrap my headphones in some colorful yarn.  i thought this would be a simple thing to make a tutorial about so i snapped some pics in the process and here is what i came up with!


so i'm using a a medium weight yarn and size 4 mm crochet hook.  if you'd like a less bulky look you can always use a lighter weight yarn and a smaller crochet that coordinates with that specific yarn; however it will take you longer, but if you really would like that look better it would be worth it!!  i think that some crochet basics would be helpful as that i do not get into the technicalities of the single crochet and how exactly to hold your yarn.

{1st}  you need to start your  project like any other crochet project: with a slip knot!!  i make mine by making a circle with my yarn pushing the end of the yarn to the back of the circle.  i then pull the yarn to through the hole leaving the tail end to get caught in the knot after i tighten it.


{2nd}  place the end of the headphone chord through the slip knot.  you will be working from right to left so leave the part you want wrapped in the yarn to the left of your slip knot. 

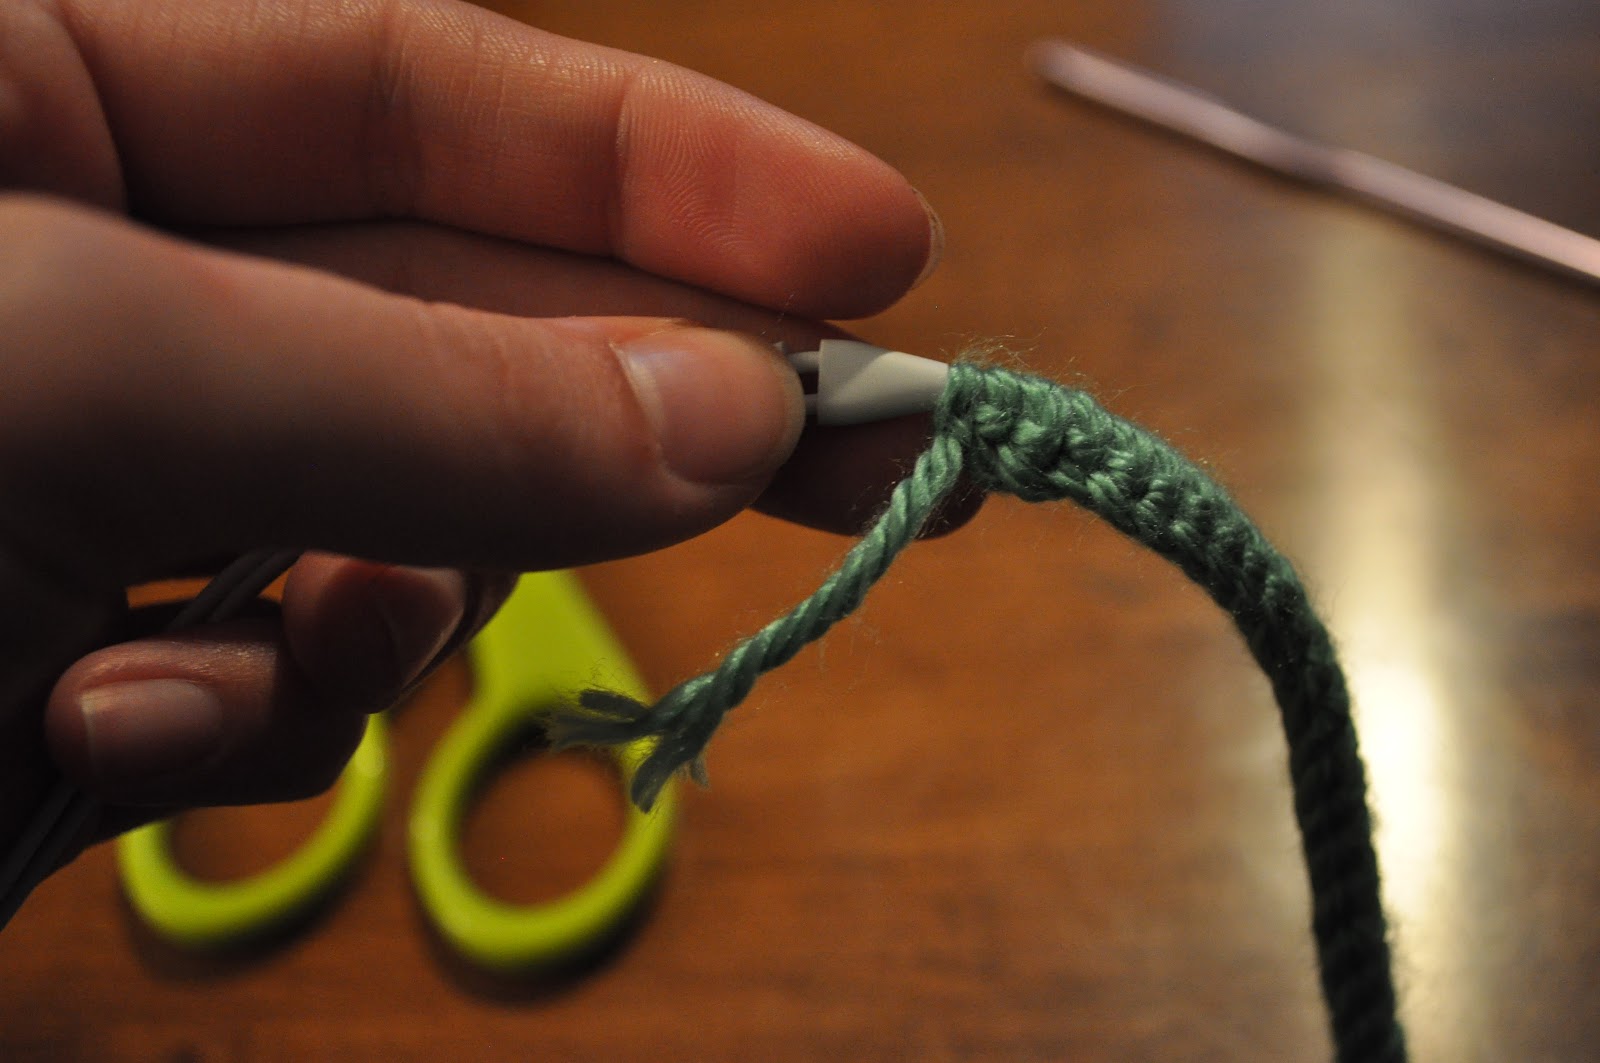
{3rd}  make sure to pull the knot snugs once the chord is in place.  you want to also make sure that you tuck the tail end that was left after you tightened your slip knot under your crochet stitches so you will get a seamless finished look.  after you have your hands situated go ahead and crochet!  as you hold the chord in your left hand, bring the hook towards you and then under the chord to grab your skein yarn from the other side.  bring the skein yarn under the chord and pull through the loops on your hook.  this is where previous crochet knowledge comes in handy.  i didn't get to take pictures of the crochet process because it was hard to handle the camera and the hook and the yarn and the chord.  but if you know some crochet basics then you should be able to catch on fairly quickly.

{notice how i'm holding the yarn, chord, hook, and how the tail end of the slip knot is tucked.}
{4th}  continue to crochet until you get to the headphone chord split.  

{5th}  now it's time to tie off and hide your ending knot.  so when you get to your last crochet stitch go ahead and cut your skein yarn at least two or three inches from the last stitch.  then take your hook and pull straight up, bringing the end of your yarn through your last stitch.  wrap the end of the yarn around the last stitch around the chord {it may be easier to pull the end through with a smaller crochet hook or the one you had been using}.  do not pull snugs yet, because the loose circle creates a loop.  wrap the end yarn through this loop twice, and then pull snugs.


{6th}  work the end of your yarn through the last few stitches with your crochet hook, hiding the end of your yarn under the stitches.  essentially you are hiding the yarn in the same way you started the work except this time it's backwards!


 {7th}  your done!! after you tuck and finish, admire your work.  you have just completed your crocheted headphone cozy!!!

words of caution: it's awkward at first to get a handle on everything, so don't get discouraged!! you can do it!!  and the yarn tends to twist as you go along.  i embraced the the twist and ended up twisting the yarn myself at the end of the project.  you could however force it to be a straight line i guess.  it's really up to you!!  

so this is my first tutorial.  have fun!! and let me know if you have problems understanding me or need more elaboration!! comment below if you think this was helpful, need more help, or if you just think this is a nifty idea!  i want to hear your thoughts!!!

mackenzie

December 9, 2011

coffee, crochet, & comfy pants

{coffee}
with cold weather being right outside our windows and the college semester coming to an end, i have consistently relied on coffee to wake and warm me up in the mornings.  okay i know it's not creative but starbucks is my favorite place to grab my very own cup of joe.  i will eat breakfast there at least 3 times a week if not more which leads to cup of joe moments {see this post}!  if i haven't described what this is very well; let me describe it to you!  a cup of joe moment is when you have your favorite coffee shop drink in hand, you take a sip, and then BAM life is awesome!  lol

anyways, i always get a tall non-fat mocha with no whip and two equal.  and for my pastry i get one of the following: an old-fashioned glazed donut, a morning bun, or the cheese danish.  every morning i get breakfast there, it wakes me up and instantly puts me in a better mood.

i have also come very dependent on the instant coffee machine-- my mom's keurig.  i don't really know if i spelled that right but it's amazing for weekends and especially rushed sunday mornings.  my favorite is the mocha but the hot chocolates are pretty awesome as well, but i guess those aren't really classified as coffees.

the bottom line is... i have always been a coffee drinker but mainly just socially {haha}.  however, this semester has almost been the death of me and really coffee and starbucks breakfast has often been that little ray of sunshine that i could look forward to during the week.  it's sad i know and coffee isn't for everyone, but now i'm hooked and i doubt i will ever see the day when i won't want anymore coffee!

-----------------------------------------------------------------------------------------


{crochet}
another thing that has been playing a role in my life lately is the wonderful art of crochet!  it all started when my friends, jessica tingle and kacie tingle teached me how to knot with flair... then this past october, i became obsessed with granny squares.  determined to force myself to do the project: i blew my paycheck on yarn, and said, "mackenzie, complete this afghan you will!"  so i had already spent the money and i had already devoted some time to learning the pattern for the granny squares and after my first couple of squares, i was off.  i have further developed my crocheting skills and have already started planning for my next projects!


as you can see, i'm not finished with this blanket, but this is the farthest i have ever gotten with a yarn work project this big!!! i'm excited and there is no stopping me!  and as the temperatures drop the quicker my hands move, so that i can actually get some use out of my creation before the season is over! so wish me luck, 63 down and 117 to go!!!

-----------------------------------------------------------------------------------------


{comfy pants}
okay, so a pair of good ole' sweats are a must for winter!  everyone has their own favorite pair they like to curl up on the couch in!  mine are from my senior year in high school.  i was a manager for the high school wrestling team and every year we got a full suit of sweats with our teams name on them to where throughout the season.  these navy blue pair were and still are my favorite.  they are HUGE {well they make me feel skinny at least lol} and they swallow me!  they have pockets and are oh so warm and fuzzy on the insides!  what else can a girl ask for!?! anyways they make me remember back to those good ole days and they keep me warm on cold nights!

-----------------------------------------------------------------------------------------

these three "c" words have been on my mind lately and i just wanted to share them with you.  they are some of my favorite things that can i enjoy during the holiday season!
mackenzie

November 29, 2011

holiday photo time!


thanksgiving is over.  and it's time for christmas.
this thanksgiving, right after the turkey had settled, my sister and i changed into our christmas outfits to take the the family portrait for the christmas cards.  since jessica and i used this chalkboard in our fall essentials posts, my mom wanted to use it in our christmas pics.  so we used it, writing, "Merry Christmas 2011," to all our loved ones.  however we also took some without the chalkboard too.


and we took some sitting on an old stone fireplace {that was left over after tearing the building down around it} with a snowman...


and using these branch lights...


and using a low shutter speed...
 

and some silly ones...

 
and here we are saying "OMG IT'S ALMOST CHRISTMAS!!" lol


 so have you taken the christmas portrait yet? do you have any neat-o ideas?  i wanna hear them!!  so comment bellow!!  and if you haven't yet, just remember the most important thing is to have fun!! GOOD LUCK and Merry Early Christmas from the Phillips family!!
mackenzie


November 21, 2011

a scripture log that's easy to keep

this weekend i went to the youth conference Hearts on Fire in Gatlinburg, Tennessee.  our youth group always has a lot of fun on this trip and i will be doing another post later on the trip and what happened there but for now i wanted to post about this nifty little idea that i had while i was down there.  even though i try so very hard not to be tempted to buy a new bible every time i go, i always seem to walk away with a new one from the book table.  they are usually at a pretty good price and i'm normally drawn to the unique and strange designs on the covers but this year i purchased a plain yellow one.  however, i intend to make it very unique.  let me explain:

{bible: $10;  scripture that i won't forget: priceless}

i'm going to write scriptures that i love ALL of over the front and back covers!  sometimes it's hard to remember verses and i hope that i can memorize these scriptures but if i can't they will always by there for me to look up.  my personal log will be on the covers & that's what will make my bible unique.    the great thing about scriptures is that they are so personal!  & anyone can do this DIY scripture log.  all you need is a leather bound bible and some sharpies!  right now i'm loving my bible and how it turned out, i know it will look even better when i get more scriptures on it!!  so it made me wonder, how do you remember scriptures and keep up with the ones that speak to your heart?? feel free to comment, i LOVE to hear from you!!  and like i said earlier there is more coming from hearts on fire, so stay tuned!!   :)
mackenzie